Part One: Farholde
With the fortress of Balentyne in (smoking) ruin and its defenders drawn out to stop the rioting in Aldencross, those few men left to guard the Shield Wall are too thinly spread to resist the howling tide of bugbears descending on Talengarde. Battered and bloody – but alive, Grimwhiskers digs himself out from beneath the rubble that fell on him when the guardhouse exploded. The rakasha conducts a token search for Vang (who had been grievously wounded even before the blackpowder detonation). He finds a few scorched tatters of the tiefling’s robe, but nothing more.
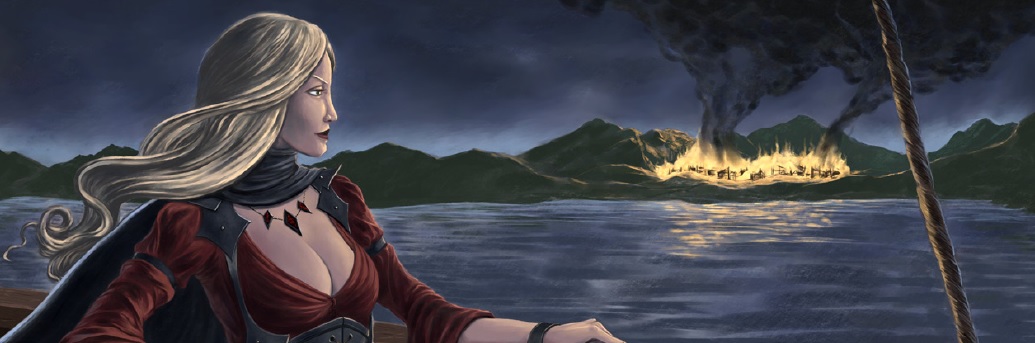
Meanwhile, having used their iron circlets to blend in with the horde of bloodthirsty bugbears, the rest of the party join in the sacking of Aldencross. During their rampage, the group are pulled aside by a snowy white bugbear who addresses ‘Bob’ as ‘her beloved’. It is Tiadora, in another form. She tells the villains to board a barge moored on the bank of Lake Tarik, where they will be briefed on their next objective. Setting off, the barge sails east for Farholde, a journey of 300 miles (twelve nights). During this turgid cruise, Tiadora visits destruction on any human settlement the barge floats passed, assuming the guise of an Alerion knight to cast the blame for these atrocities at the feet of those stalwart defenders of the realm.
Meanwhile, having used their iron circlets to blend in with the horde of bloodthirsty bugbears, the rest of the party join in the sacking of Aldencross. During their rampage, the group are pulled aside by a snowy white bugbear who addresses ‘Bob’ as ‘her beloved’. It is Tiadora, in another form. She tells the villains to board a barge moored on the bank of Lake Tarik, where they will be briefed on their next objective. Setting off, the barge sails east for Farholde, a journey of 300 miles (twelve nights). During this turgid cruise, Tiadora visits destruction on any human settlement the barge floats passed, assuming the guise of an Alerion knight to cast the blame for these atrocities at the feet of those stalwart defenders of the realm.
On the twelfth night of their voyage, Cardinal Adrastus Thorn makes an appearance, to brief his loyal minions on their new mission. Lost somewhere in the vast, trackless jungle south of Farholde (the Caer Bryr) is the Horn of Abaddon, where a daemon prince was worshipped by a death cult calling themselves the Sons of the Pale Horseman. When King Markadian I (called ‘The Victor’) destroyed the cult, he cast the daemon prince from this world and forbade its return by fashioning a powerful silver seal, empowered by the blessings of Mitra. Cardinal Thorn commands the party to;
A: Find the Horn of Abaddon.
B: Break the seal and release the daemon prince.
C: Compel the fiend to give them the Tears of Achylss, the pestilence it was preparing to unleash before King Markadian I and his knights waded in and ruined everything.
The Cardinal intends to release the Tears on Talengarde, a plague of such virulence that it will bring the nation to its knees! Having petitioned Asmodeus for aid in this nefarious endeavour, Thorn has been granted the power to return a vengeful Vang to this world as a demon! (This was Andy’s new character; Demon Vang!)

Disembarking in Farholde, the villains are left to their own devices until nightfall, as Tiadora has arranged a dinner date with a devil worshipping nobleman called Baron Arkov Vandermir. Since a fair few ships pass through Farholde (hauling trade goods to/from settlements in the Savage North), Grimwhiskers asks around and learns that his treacherous first mate, Anton Sootscale was in town not two days ago and is likely to return within the fortnight! The rakasha hires a couple of ruffians to keep an eye out for his old enemy. Overhearing Grimwhisker’s plot, Slithe has a better idea! Noticing that the lighthouse west of Farholde is in a state of shameful disrepair, the lizardman burrows into the foundations, causing the beacon tower to tumble into the sea. Without the lighthouse to guide passing ships into safe harbour, Sootscale and his crew will surely run aground on the rocks. Slithe leaves a couple of zombies to grab any survivors that wash up.
Tarting themselves up, the villains head to the estate of Baron Vandermir for their din-dins. Over pudding, the baron broaches the issue of their presence in Farholde. Only by promising the ambitious nobleman lordship over all of the Northern Borderlands do the party secure an alliance.
Tarting themselves up, the villains head to the estate of Baron Vandermir for their din-dins. Over pudding, the baron broaches the issue of their presence in Farholde. Only by promising the ambitious nobleman lordship over all of the Northern Borderlands do the party secure an alliance.

Driven by their fear of the Cardinal’s displeasure, the party head into the Caer Bryr the next day. After spending the better part of a month wandering around in circles and having all manner of dreadful adventures, they eventually locate the Horn of Abaddon, overgrown and abandoned for over 80 years. Despite its apparent desertion, the Horn is not without guardians! As the villains approach, a towering tree rumbles into life and begins to uproot itself from the ground, where it has stood sentinel since King Markadian I charged it with this solemn duty eight decades ago. The treant introduces itself as Jubbek the Eldest and warns the villains that they have chanced upon a cursed and evil place and should turn back immediately. The PCs explain that they have spent the last three weeks slogging through the jungle and they will be going inside, whether some jumped up shrubbery likes it or not.
Slithe burrows into the earth beneath the angered treant and attempts to knot its roots together (much like you would tie someone’s shoelaces, causing them to trip). ‘Bob’ targets the treant’s ‘face’ and puts an arrow into each of its ‘eyes’, blinding the creature. After Jubbek the Eldest succumbs to the villain’s dirty tactics, Slithe uses his necromantic powers to reanimate the treant as an evil lackey, dripping poisonous sap all over the place and it stomps around blindly.
Slithe burrows into the earth beneath the angered treant and attempts to knot its roots together (much like you would tie someone’s shoelaces, causing them to trip). ‘Bob’ targets the treant’s ‘face’ and puts an arrow into each of its ‘eyes’, blinding the creature. After Jubbek the Eldest succumbs to the villain’s dirty tactics, Slithe uses his necromantic powers to reanimate the treant as an evil lackey, dripping poisonous sap all over the place and it stomps around blindly.
Part Two: Taking the Horn
The villains mislike the look of the look of the maw-like cavern at the base of the Horn and instead enter via an overgrown portal on an upper level. These halls appear to have once been the living quarters of the death cult. Following King Markadian I’s conquest of the Horn, the slain cultists were left to moulder where they fell in battle against the Victor’s knights. Skeletons litter the dungeon, where they have lain undisturbed for 80 years. A glowing, silver light draws Slithe’s attention to a spear of shining steel pinning the desiccated body of a minotaur to a wall. When the lizardman wrenches the weapon free, the corpse crumbles into dust. Noting the stylised letter ‘V’ engraved upon the shaft, Slithe wonders if this spear was once brandished by the Victor himself?! He bundles it up in rags to mute its radiance, then follows on after the rest of the group.
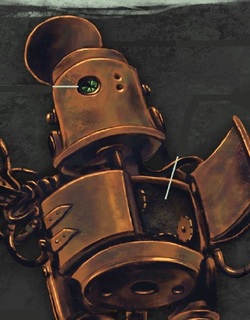
When he catches up, the rest of the party are poking around the wreckage of an abandoned alchemy lab. Broken glass crunches underfoot, it seems the Victor’s men trashed this area too. The villains gather around the bronze body of a prone construct, the glass dome atop its head has been shattered and the human brain that once animated the golem is now little more than a shrivelled, black sponge. It is decided that with a fresh brain and a successful Repair roll, the dormant golem could be coaxed into life once more. Everyone else looks to Grimwhiskers speculatively… well, it’s not as though he actually uses it….
Forging on, the party find a courtyard full of unlikely statues. They spend the next thirty minutes (real time!) bickering about how to best prepare for the gorgon they are convinced is lurking nearby. (There is NO gorgon! One of the wizards that fought alongside the Victor cast a petrification spell on the cultists as they fled.)
When they (eventually!) pluck up the courage to press on, they do so with great wariness, peering around every corner with a little hand mirror before turning it. Soon, they begin to hear an eerie chanting and follow the sound back to its source. Ascending to the next level of the Horn, the group enter a cavernous temple, where the grim spectre of the cult’s last high priest (Ezra Thrice-Damned) leads his undead congregation in prayer to their daemonic patron. Having the misfortune to have the greatest Charisma bonus, Grimwhiskers is shoved forward to treat with the dread wraith. Initially rather creepy and menacing, the high priest becomes ingratiatingly helpful once he realises that the intruders are planning to release Vetra-Kali Eats-the-Eyes. He goes so far as to give them a large emerald, which the wraith insists is integral to the ritual they must perform to release the daemon prince. Unfortunately, he has no idea where the other two stones have got to - as when the Victor stormed the temple, two of the cultists took the gems and fled, rather than allow them to fall into the clutches of the Mitran church.
They didn’t get very far. Having seen the first ‘eye’ of Vetra-Kali, Grimwhiskers recalls spotting a similar stone clutched in the stony grip of one of the statues that the group passed earlier. Warning everyone to stand back, the rakasha tries to shatter the statue with his powerful kung-fu! He hits the effigy and breaks every bone in his hand (Critical Failure). Hefting a rock, Betty breaks the statue’s arm off at the elbow and begins prising the closed fingers from around the second emerald.

Having secured two of the three ‘eyes’ of the daemon prince, the villains can no longer ignore the possibility that the last stone has found its way into the tunnels beneath the temple. Ezra Thrice-Damned shows them the secret stair that spirals from the top of the Horn down to the caves at its base. Scenting the dank air, Slithe detects the presence of boggards occupying the dark recesses below the earth, possibly an entire tribe of the slimy buggers. Deciding they’d rather not advertise their presence just yet, Slithe leads the party towards the exit, following the smell of clean air. The group are taken entirely by surprise when a group of hostile, frog-like humanoids hop out of the shadows. One croaks deafeningly, bursting one of Grimwhisker’s eardrums (level of Fatigue), another runs Slithe through the gut with its vicious trident. Drexab transforms into his wolf form and rends the boggards with claw and fang, their weapons (which are not silver) do little to deter the beast. Driving off the amphibious menace, the villains limp out into the light and hide behind their treant until the bad boggards go away. Scooping up the wounded, the blind treant ferries the villains back to Farholde.
Since all of the PCs are universally rubbish at Healing, Slithe and Grimwhiskers don their circlets and skulk up to the Abbey of Saint Cynthia-Celeste in the guise of wounded pilgrims, waylaid by bandits on the road. While their wounds are being tended by the unsuspecting nuns, they overhear an elderly sister instructing a group of initiates in the legend of Cynthia-Celeste. The old woman speaks of how the valorous saint was slain in battle with the demon Skathyl, but in doing so bound the fiend into a sword that is now kept locked away in the bowels of the abbey. The villains consider breaking into the vault to steal this powerful weapon, but wuss out when they realise they would have to slog through a horde of elite, combat-hardened battle nuns to claim their prize.
Once recovered, the party are summoned to the estate of Baron Vandermir, who reminds them that the Knot Hibernal are due to arrive in Farholde on the morrow and suggests that someone be there to meet them at the docks. He also tells them that he will be celebrating his 105th birthday in two months time and extends them all an invitation. He boasts that anyone who’s anyone in Farholde will be there, including Sir Valin Darian, whose own family tree branches off that of the royal lineage.
Having identified two of the three sacrificial victims they will need to awaken Vetra-Kali (any one of the 300 Mitran nuns at the abbey and Sir Valin, who carries the blood of the Victor in his veins), Slithe ensconces himself within the Baron’s library, trying to trace a blood relation to one of the original Sons of the Pale Horseman. (Gary was over the moon to finally have an opportunity to use the Investigation skill.) His studious efforts pay off, there is a family still residing in Farholde whose bloodline can be traced back to one of the cultists that survived the Victor’s purge.


Meanwhile, Betty, Drexab and Grimwhiskers make haste to greet the Seventh Knot as their barge moors up the next morning. The Knot Hibernal consists of four members; Elise Zandaria (beautiful – but deadly – winter witch), Dostan Alfson (half-elf barbarian) and the brothers Titus & Tallus Rackburn. The seventh knot are less than enthused by the prospect of helping the Ninth Knot clear the boggards out of the caves beneath the Horn, but advise that Cardinal Thorn has sent them a present that might be of some use in that thankless endeavour. Elise motions to a large, cumbersome box that several deckhands are struggling to offload. Noticing several air holes have been drilled into the lid, Grimwhiskers gives the crate a kick, causing whatever is inside to roar in protest. The rakasha recognises the familiar musk of Grumblejack, the ogre highwayman who the party recruited to the Cardinal’s cause. Grumblejack has been cooped up inside a little box for several weeks and now that Elise’s magic is wearing off the big fellow is eager to stretch his legs. Unfortunately, the appearance of an ogre in the middle of Farholde is likely to excite comment. Paying over the odds for the use of a sturdy wagon, the villains ferry the crate out of town. Parking up beside Slithe’s twisted treant, they feed the driver to Grumblejack, who was rather peckish after his long sea voyage.
Before heading back to the Horn, the villains resolve to abduct the child that Slithe identified as a descendent of one of the original death cultists. While the lizardman lurks in the street with a smelly sack at the ready, Betty breaks into the house, slaughters the boy’s poor mother as she tucks him into bed and bundles the child out of the window. The scoundrels share a jolly chuckle as they hear the distraught husband/father crying out in dismay.
(Yeah, it all got a bit dark towards the end there….) :(
